
Introduction to Valentine’s Day Cookie Cups
Valentine’s Day is just around the corner, and what better way to celebrate than with delightful Valentine’s Day Cookie Cups? These adorable treats are not only delicious but also incredibly easy to whip up, making them a perfect solution for busy moms like me. Whether you’re looking to impress your loved ones or simply want to indulge in a sweet moment, these cookie cups are sure to bring smiles all around. Plus, they’re a fun way to get the kids involved in the kitchen, creating sweet memories together. Let’s dive into this delightful recipe!
Why You’ll Love This Valentine’s Day Cookie Cups
These Valentine’s Day Cookie Cups are a dream come true for busy families. They come together in just 35 minutes, making them a quick and satisfying treat. The combination of buttery cookie and gooey chocolate chips is simply irresistible. Plus, they’re customizable! You can add sprinkles or even fill them with frosting for an extra surprise. Trust me, these cookie cups will become a cherished tradition in your home!
Ingredients for Valentine’s Day Cookie Cups
Gathering the right ingredients is the first step to creating these delightful Valentine’s Day Cookie Cups. Here’s what you’ll need:
- Unsalted butter: This is the base of your cookie dough, providing richness and flavor. Make sure it’s softened for easy mixing.
- Granulated sugar: This sweetener helps create a lovely texture and adds sweetness to your cookie cups.
- Brown sugar: Packed brown sugar adds moisture and a hint of caramel flavor, making your cookie cups extra delicious.
- Large eggs: Eggs bind the ingredients together and contribute to the overall texture, making your cookie cups soft and chewy.
- Vanilla extract: A splash of vanilla enhances the flavor, giving your cookie cups that warm, comforting taste.
- All-purpose flour: This is the main structure of your cookie cups. It helps them hold their shape while baking.
- Baking soda: This leavening agent helps your cookie cups rise, creating a light and fluffy texture.
- Salt: Just a pinch of salt balances the sweetness and enhances the overall flavor of your cookie cups.
- Chocolate chips: These are the star of the show! They melt beautifully and add a rich, gooey texture to each bite.
- Sprinkles (optional): Add a pop of color and fun! They’re perfect for decorating your cookie cups, especially for Valentine’s Day.
For exact measurements, check the bottom of the article where you can find a printable version of the recipe. Happy baking!
How to Make Valentine’s Day Cookie Cups
Now that we have our ingredients ready, let’s dive into the fun part—making these delightful Valentine’s Day Cookie Cups! Follow these simple steps, and you’ll have a batch of sweet treats in no time.
Step 1: Preheat the Oven
First things first, preheat your oven to 350°F (175°C). Preheating is crucial because it ensures that your cookie cups bake evenly. If the oven isn’t hot enough, your cookies may spread too much or not rise properly. So, let that oven warm up while you prepare the dough!
Step 2: Cream the Butter and Sugars
In a large bowl, cream together the softened unsalted butter, granulated sugar, and brown sugar until the mixture is smooth and fluffy. This process is essential for achieving the right texture. It incorporates air into the dough, making your cookie cups light and tender. Don’t rush this step; take your time to get it just right!
Step 3: Add Eggs and Vanilla
Next, add the large eggs and vanilla extract to the creamed mixture. Mix until everything is well combined. The eggs provide moisture and help bind the ingredients together, while the vanilla adds that warm, comforting flavor we all love. It’s like a hug in a cookie cup!
Step 4: Combine Dry Ingredients
In a separate bowl, whisk together the all-purpose flour, baking soda, and salt. Mixing the dry ingredients separately helps ensure that the baking soda and salt are evenly distributed throughout the flour. This step is key to achieving that perfect rise and flavor in your cookie cups.
Step 5: Mix Wet and Dry Ingredients
Now, gradually add the dry ingredients to the wet mixture. Stir gently until just combined. Be careful not to overmix! Overmixing can lead to tough cookie cups, and we want them to be soft and chewy. A few flour streaks are okay; they’ll disappear as you fold in the next ingredients.
Step 6: Fold in Chocolate Chips and Sprinkles
Time to add the star ingredients! Gently fold in the chocolate chips and sprinkles, if you’re using them. Folding is a technique that helps maintain the airiness of the dough while evenly distributing the chocolate and sprinkles. It’s like tucking in a cozy blanket around your cookie cups!
Step 7: Prepare the Muffin Tin
Grease a muffin tin with cooking spray or butter to prevent sticking. This step is crucial for easy removal later. Using a cookie scoop, fill each muffin cup with the cookie dough, pressing down slightly to ensure they hold their shape while baking. Proper portioning is key to getting evenly sized cookie cups!
Step 8: Bake the Cookie Cups
Place the muffin tin in the preheated oven and bake for 12-15 minutes. Keep an eye on them! You want the edges to be golden brown while the centers remain soft. A toothpick inserted in the center should come out with a few moist crumbs. Remember, they’ll continue to cook a bit after you take them out!
Step 9: Cool and Decorate
Once baked, allow the cookie cups to cool in the tin for about 5 minutes before transferring them to a wire rack. This cooling time helps them set. Once they’re completely cool, feel free to decorate with additional sprinkles or frosting for that extra touch of love. Your Valentine’s Day Cookie Cups are now ready to be enjoyed!
Tips for Success
- Make sure your butter is softened for easy mixing.
- Don’t skip the preheating step; it’s vital for even baking.
- Use a cookie scoop for uniform cookie cups.
- Check for doneness a minute or two early to avoid overbaking.
- Let the cookie cups cool completely before decorating.
Equipment Needed
- Muffin tin: Essential for shaping your cookie cups. A silicone muffin pan works great too!
- Mixing bowls: Use a large bowl for wet ingredients and a medium bowl for dry ingredients.
- Whisk and spatula: A whisk for mixing dry ingredients and a spatula for folding in chocolate chips.
- Cookie scoop: Helps portion the dough evenly. A tablespoon works in a pinch!
Variations
- Nutty Delight: Add chopped nuts like walnuts or pecans for a crunchy texture and extra flavor.
- Gluten-Free Option: Substitute all-purpose flour with a gluten-free flour blend for a delicious gluten-free treat.
- Dark Chocolate Lovers: Use dark chocolate chips instead of semi-sweet for a richer taste.
- Fruit Infusion: Mix in dried fruits like cranberries or cherries for a fruity twist.
- Vegan Version: Replace butter with coconut oil and use flax eggs for a plant-based alternative.
Serving Suggestions
- Pair your Valentine’s Day Cookie Cups with a glass of cold milk for a classic treat.
- Serve alongside fresh strawberries or raspberries for a fruity contrast.
- For a festive touch, arrange cookie cups on a heart-shaped platter.
- Drizzle with melted chocolate or a sprinkle of powdered sugar for added flair.
FAQs about Valentine’s Day Cookie Cups
Can I make these cookie cups ahead of time?
Absolutely! You can prepare the dough a day in advance and store it in the fridge. Just scoop it into the muffin tin and bake when you’re ready. This makes it a great option for busy days leading up to Valentine’s Day!
What can I use to fill the cookie cups?
The possibilities are endless! You can fill them with frosting, chocolate ganache, or even a scoop of ice cream. Each filling adds a delightful surprise that will make your Valentine’s Day Cookie Cups even more special.
How should I store leftover cookie cups?
Store your cookie cups in an airtight container at room temperature for up to a week. If you want to keep them fresh longer, you can refrigerate them, but they’re best enjoyed at room temperature!
Can I freeze these cookie cups?
Yes, you can freeze them! Just make sure they’re completely cooled before placing them in a freezer-safe container. They’ll stay fresh for up to three months. Thaw them at room temperature before serving.
What if I don’t have a muffin tin?
No worries! You can use a baking sheet and shape the dough into small mounds. Just keep in mind that they won’t have the cup shape, but they’ll still taste delicious!
Final Thoughts
Making Valentine’s Day Cookie Cups is more than just baking; it’s about creating sweet memories with your loved ones. The joy of mixing, baking, and decorating together brings a warmth that fills the heart. Each bite of these delightful cookie cups is a reminder of love and togetherness. Whether you’re sharing them with family or surprising a friend, these treats are sure to spread smiles. So, roll up your sleeves, gather your ingredients, and let the magic of baking fill your home with love this Valentine’s Day. Happy baking, and enjoy every delicious moment!
Print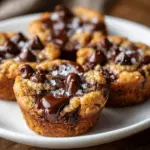
Valentine’s Day Cookie Cups: Bake Sweet Memories Today!
- Prep Time: 20 minutes
- Cook Time: 15 minutes
- Total Time: 35 minutes
- Yield: 24 cookie cups 1x
- Category: Dessert
- Method: Baking
- Cuisine: American
- Diet: Vegetarian
Description
Delicious and adorable cookie cups perfect for celebrating Valentine’s Day.
Ingredients
- 1 cup unsalted butter, softened
- 1 cup granulated sugar
- 1 cup brown sugar, packed
- 2 large eggs
- 2 teaspoons vanilla extract
- 3 cups all-purpose flour
- 1 teaspoon baking soda
- 1/2 teaspoon salt
- 1 cup chocolate chips
- 1/2 cup sprinkles (optional)
Instructions
- Preheat your oven to 350°F (175°C).
- In a large bowl, cream together the softened butter, granulated sugar, and brown sugar until smooth.
- Add the eggs and vanilla extract, mixing until well combined.
- In a separate bowl, whisk together the flour, baking soda, and salt.
- Gradually add the dry ingredients to the wet ingredients, mixing until just combined.
- Fold in the chocolate chips and sprinkles if using.
- Grease a muffin tin and scoop the cookie dough into each cup, pressing down slightly.
- Bake for 12-15 minutes or until the edges are golden brown.
- Allow to cool before removing from the tin.
- Decorate with additional sprinkles or frosting if desired.
Notes
- For a softer cookie, do not overbake.
- These can be filled with frosting or ganache for an extra treat.
- Store in an airtight container for up to a week.
Nutrition
- Serving Size: 1 cookie cup
- Calories: 150
- Sugar: 10g
- Sodium: 100mg
- Fat: 7g
- Saturated Fat: 4g
- Unsaturated Fat: 2g
- Trans Fat: 0g
- Carbohydrates: 20g
- Fiber: 1g
- Protein: 2g
- Cholesterol: 30mg


