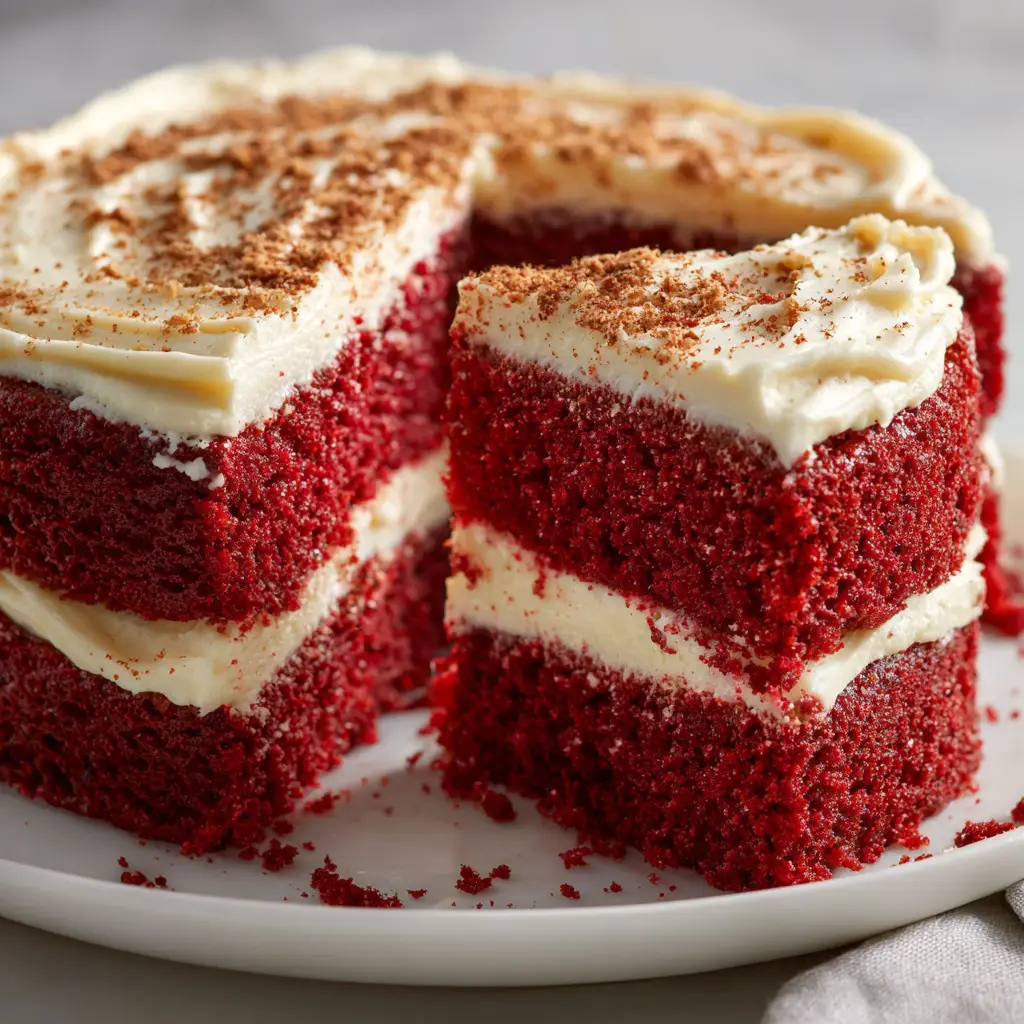
Introduction to Red Velvet Honeybun Cake with Cinnamon Cream Cheese Icing
As a busy mom, I know how precious time can be, especially when it comes to baking. That’s why I absolutely adore this Red Velvet Honeybun Cake with Cinnamon Cream Cheese Icing. It’s not just a cake; it’s a delightful treat that brings joy to any occasion. Imagine a moist, velvety cake swirled with a luscious cinnamon cream cheese icing, all coming together in one easy recipe. Whether you’re celebrating a birthday or just want to brighten up a regular Tuesday, this cake is your go-to solution. Trust me, your loved ones will be asking for seconds!
Why You’ll Love This Red Velvet Honeybun Cake with Cinnamon Cream Cheese Icing
This Red Velvet Honeybun Cake with Cinnamon Cream Cheese Icing is a true game-changer for busy lives. It’s incredibly easy to whip up, taking just about an hour from start to finish. The rich, velvety flavor paired with the warm cinnamon notes creates a taste sensation that’s hard to resist. Plus, it’s perfect for any occasion, making it a versatile dessert that will impress family and friends alike!
Ingredients for Red Velvet Honeybun Cake with Cinnamon Cream Cheese Icing
Gathering the right ingredients is the first step to creating this delightful Red Velvet Honeybun Cake with Cinnamon Cream Cheese Icing. Here’s what you’ll need:
- All-purpose flour: The backbone of your cake, providing structure and texture.
- Granulated sugar: Sweetens the cake and helps create that lovely moistness.
- Baking soda: This leavening agent gives the cake its lift, making it light and fluffy.
- Salt: A pinch enhances the flavors, balancing the sweetness.
- Cocoa powder: Just a hint adds depth to the flavor without overpowering the red velvet essence.
- Vegetable oil: Keeps the cake moist and tender; you can also use canola oil if preferred.
- Buttermilk: Adds a tangy flavor and helps create a soft crumb. If you don’t have buttermilk, mix milk with a splash of vinegar as a substitute.
- Large eggs: They bind the ingredients together and contribute to the cake’s richness.
- Red food coloring: This is what gives the cake its signature vibrant hue. You can use gel or liquid food coloring.
- Vanilla extract: A must for that warm, comforting flavor that complements the cake beautifully.
- White vinegar: It reacts with the baking soda, helping the cake rise and adding a subtle tang.
- Brown sugar: Adds moisture and a hint of caramel flavor to the cinnamon swirl.
- Ground cinnamon: The star of the swirl, bringing warmth and spice to each bite.
- Cream cheese: The base for your icing, providing a rich and creamy texture.
- Powdered sugar: Sweetens the icing and gives it that smooth finish.
- Vanilla extract (for icing): Just a touch enhances the flavor of the cream cheese icing.
For exact measurements, check the bottom of the article where you can find everything listed for easy printing. Happy baking!
How to Make Red Velvet Honeybun Cake with Cinnamon Cream Cheese Icing
Step 1: Preheat and Prepare
First things first, preheat your oven to 350°F (175°C). This step is crucial for getting that perfect rise. While the oven warms up, grab a 9×13 inch baking pan and grease it well. You can use butter or cooking spray. This will ensure your cake slides out easily once it’s baked.
Step 2: Mix Dry Ingredients
In a large mixing bowl, combine the all-purpose flour, granulated sugar, baking soda, salt, and cocoa powder. Whisk them together until they’re well blended. This step is important because it ensures that the leavening agents are evenly distributed, giving your cake that light, fluffy texture.
Step 3: Combine Wet Ingredients
In another bowl, mix together the vegetable oil, buttermilk, eggs, red food coloring, vanilla extract, and white vinegar. Whisk until everything is well combined. The oil and buttermilk will keep your cake moist, while the food coloring gives it that signature red hue. Don’t skip the vinegar; it reacts with the baking soda to help the cake rise!
Step 4: Combine Wet and Dry Mixtures
Now, it’s time to bring the two mixtures together. Gradually pour the wet ingredients into the dry ingredients. Stir gently until everything is just combined. Be careful not to overmix; a few lumps are perfectly fine. This will keep your cake tender and delicious.
Step 5: Prepare the Cinnamon Swirl
In a small bowl, mix the brown sugar and ground cinnamon together. This will create the delightful swirl that adds a burst of flavor to your cake. Make sure it’s well combined so that every bite has that warm cinnamon goodness.
Step 6: Layer the Batter
Pour half of the red velvet batter into your prepared baking pan. Then, sprinkle half of the cinnamon mixture over the batter. Next, pour the remaining batter on top and finish with the rest of the cinnamon mixture. This layering creates a beautiful swirl effect.
Step 7: Swirl the Mixture
Using a knife or a skewer, gently swirl the cinnamon mixture into the batter. Don’t overdo it; you want to create a marbled effect, not completely mix it in. This step is where the magic happens, giving your cake those lovely cinnamon ribbons.
Step 8: Bake the Cake
Place the pan in the preheated oven and bake for 30-35 minutes. To check for doneness, insert a toothpick into the center of the cake. If it comes out clean or with a few moist crumbs, your cake is ready. If not, give it a few more minutes.
Step 9: Make the Cream Cheese Icing
While the cake is baking, it’s the perfect time to prepare the icing. In a mixing bowl, beat the softened cream cheese, powdered sugar, and vanilla extract until smooth and creamy. This icing is the cherry on top, adding a rich, tangy flavor that pairs beautifully with the cake.
Step 10: Ice the Cake
Once the cake has cooled completely, spread the cream cheese icing generously over the top. You can use a spatula for a smooth finish or the back of a spoon for a more rustic look. Either way, it’s going to be delicious!
Tips for Success
- Measure your ingredients accurately for the best results.
- Let the cream cheese sit at room temperature for easier mixing.
- Don’t skip the vinegar; it’s key for a fluffy cake.
- For a richer flavor, let the cake sit overnight before serving.
- Use a toothpick to check for doneness; it should come out clean.
Equipment Needed
- 9×13 inch baking pan: A standard size for this cake; you can use a glass or metal pan.
- Mixing bowls: A set of various sizes will help with mixing ingredients.
- Whisk: Essential for combining wet and dry ingredients smoothly.
- Spatula: Perfect for spreading the icing evenly.
- Toothpick: Handy for checking the cake’s doneness.
Variations
- Chocolate Chip Addition: Fold in some chocolate chips into the batter for an extra layer of sweetness and texture.
- Nutty Twist: Add chopped walnuts or pecans to the cinnamon swirl for a delightful crunch.
- Gluten-Free Option: Substitute all-purpose flour with a gluten-free blend to make this cake suitable for gluten-sensitive friends.
- Vegan Version: Replace eggs with flax eggs and use a plant-based cream cheese for the icing.
- Spiced Variation: Add a pinch of nutmeg or allspice to the cinnamon mixture for a warm, spiced flavor.
Serving Suggestions
- Pair with a scoop of vanilla ice cream for a delightful contrast.
- Serve alongside a cup of freshly brewed coffee or tea for a cozy afternoon treat.
- Garnish with fresh berries or a sprinkle of chopped nuts for added texture.
- Present on a decorative cake stand to impress your guests.
FAQs about Red Velvet Honeybun Cake with Cinnamon Cream Cheese Icing
Can I make this Red Velvet Honeybun Cake ahead of time?
Absolutely! This cake actually tastes even better the next day. Just let it cool completely, then cover it and store it in the refrigerator. The flavors will meld beautifully overnight.
What can I use instead of buttermilk?
If you don’t have buttermilk on hand, no worries! You can easily make a substitute by mixing one cup of milk with a tablespoon of vinegar or lemon juice. Let it sit for about 5 minutes before using.
How should I store leftovers?
Store any leftover Red Velvet Honeybun Cake in an airtight container in the refrigerator. It should stay fresh for about 3-4 days. Just remember to bring it to room temperature before serving for the best flavor!
Can I freeze this cake?
Yes, you can freeze the cake! Just wrap it tightly in plastic wrap and then in aluminum foil. It can be frozen for up to 3 months. Thaw it in the refrigerator overnight before serving.
What can I do if I don’t have red food coloring?
If you’re out of red food coloring, you can use beet juice or pomegranate juice for a natural alternative. Keep in mind that the color may not be as vibrant, but it will still taste delicious!
Final Thoughts
Creating this Red Velvet Honeybun Cake with Cinnamon Cream Cheese Icing is more than just baking; it’s about sharing joy and love with those around you. The vibrant colors and delightful flavors make it a centerpiece for any gathering, big or small. I cherish the moments spent in the kitchen, knowing that this cake will bring smiles and sweet memories. Whether it’s a special occasion or a simple family dinner, this cake is sure to impress. So, roll up your sleeves, embrace the process, and enjoy every delicious bite of this delightful treat!
Print
Red Velvet Honeybun Cake with Cinnamon Cream Cheese Icing: A Must-Try Delight!
- Prep Time: 20 minutes
- Cook Time: 35 minutes
- Total Time: 55 minutes
- Yield: 12 servings 1x
- Category: Dessert
- Method: Baking
- Cuisine: American
- Diet: Vegetarian
Description
A deliciously moist red velvet cake swirled with a cinnamon cream cheese icing, perfect for any occasion.
Ingredients
- 2 cups all-purpose flour
- 1 1/2 cups granulated sugar
- 1 teaspoon baking soda
- 1 teaspoon salt
- 1 teaspoon cocoa powder
- 1 cup vegetable oil
- 1 cup buttermilk
- 2 large eggs
- 2 tablespoons red food coloring
- 1 teaspoon vanilla extract
- 1 teaspoon white vinegar
- 1/2 cup brown sugar
- 1 tablespoon ground cinnamon
- 8 oz cream cheese, softened
- 1/2 cup powdered sugar
- 1 teaspoon vanilla extract (for icing)
Instructions
- Preheat the oven to 350°F (175°C) and grease a 9×13 inch baking pan.
- In a large bowl, mix together flour, sugar, baking soda, salt, and cocoa powder.
- In another bowl, combine oil, buttermilk, eggs, food coloring, vanilla extract, and vinegar.
- Gradually add the wet ingredients to the dry ingredients and mix until well combined.
- In a small bowl, mix brown sugar and cinnamon for the swirl.
- Pour half of the cake batter into the prepared pan, sprinkle half of the cinnamon mixture, then pour the remaining batter and top with the rest of the cinnamon mixture.
- Use a knife to swirl the cinnamon mixture into the batter.
- Bake for 30-35 minutes or until a toothpick inserted comes out clean.
- While the cake is baking, prepare the icing by beating cream cheese, powdered sugar, and vanilla extract until smooth.
- Once the cake is cool, spread the cream cheese icing on top.
Notes
- For a richer flavor, let the cake sit overnight before serving.
- Store leftovers in an airtight container in the refrigerator.
- Can be served warm or cold.
Nutrition
- Serving Size: 1 slice
- Calories: 350
- Sugar: 30g
- Sodium: 300mg
- Fat: 18g
- Saturated Fat: 8g
- Unsaturated Fat: 8g
- Trans Fat: 0g
- Carbohydrates: 45g
- Fiber: 1g
- Protein: 4g
- Cholesterol: 50mg


