
Introduction to Red Velvet Crinkle Cookie
As a busy mom, I know how precious time can be, especially when it comes to baking. That’s why I absolutely adore these Red Velvet Crinkle Cookies! They’re not just a treat; they’re a delightful way to bring a little joy into your day. Soft, chewy, and dusted with powdered sugar, these cookies are perfect for any occasion. Whether you’re looking to impress guests or simply want a sweet escape after a long day, this recipe is your go-to solution. Trust me, once you try them, you’ll be hooked!
Why You’ll Love This Red Velvet Crinkle Cookie
These Red Velvet Crinkle Cookies are a dream come true for busy lives. They come together in just 15 minutes of prep time, making them a quick and easy dessert option. The rich, velvety flavor combined with that delightful powdered sugar coating creates a taste sensation that’s hard to resist. Plus, they’re perfect for sharing, so you can spread the love with family and friends!
Ingredients for Red Velvet Crinkle Cookie
Gathering the right ingredients is the first step to creating these delightful Red Velvet Crinkle Cookies. Here’s what you’ll need:
- All-purpose flour: This is the base of your cookies, providing structure and chewiness.
- Cocoa powder: Just a tablespoon adds a subtle chocolate flavor, enhancing the red velvet experience.
- Baking powder: This leavening agent helps the cookies rise, giving them that perfect soft texture.
- Salt: A pinch of salt balances the sweetness and enhances the overall flavor.
- Unsalted butter: Softened butter creates a rich, creamy base for your dough, making it melt-in-your-mouth delicious.
- Granulated sugar: This sweetener adds the necessary sweetness and helps achieve that lovely crinkle effect.
- Large egg: The egg binds everything together, contributing to the cookie’s soft texture.
- Red food coloring: This is what gives these cookies their signature vibrant hue. Feel free to adjust the amount for a deeper color!
- Vanilla extract: A splash of vanilla adds warmth and depth to the flavor profile.
- Powdered sugar: For dusting, this gives the cookies a beautiful, snowy finish that’s simply irresistible.
For those looking to make substitutions, you can use gluten-free flour for a gluten-free version or swap in coconut oil for a dairy-free option. If you’re out of red food coloring, beet juice can be a natural alternative, though it may alter the flavor slightly.
Exact measurements for these ingredients can be found at the bottom of the article, ready for you to print and take to the kitchen!
How to Make Red Velvet Crinkle Cookie
Now that you have your ingredients ready, let’s dive into the fun part—making these delightful Red Velvet Crinkle Cookies! Follow these simple steps, and you’ll have a batch of cookies that will make your kitchen smell heavenly.
Step 1: Preheat the Oven
First things first, preheat your oven to 350°F (175°C). Preheating is crucial because it ensures that your cookies bake evenly. If the oven isn’t hot enough, your cookies might spread too much or not rise properly. Trust me, a well-preheated oven is the secret to cookie perfection!
Step 2: Prepare the Dry Ingredients
In a medium bowl, whisk together the all-purpose flour, cocoa powder, baking powder, and salt. This step is essential for evenly distributing the leavening agent and cocoa. It also helps to aerate the flour, making your cookies light and fluffy. Set this bowl aside for now; we’ll come back to it shortly!
Step 3: Cream the Butter and Sugar
In a large mixing bowl, cream the softened unsalted butter and granulated sugar together until the mixture is light and fluffy. This usually takes about 2-3 minutes with an electric mixer. The goal here is to incorporate air into the butter, which will help your cookies rise beautifully. You’ll know it’s ready when it looks pale and creamy!
Step 4: Mix in the Wet Ingredients
Next, add the large egg, red food coloring, and vanilla extract to the butter mixture. Mix until everything is well combined. The red food coloring is what gives these cookies their signature hue, so don’t be shy—add a little extra if you want a bolder color! This step is where the magic begins to happen.
Step 5: Combine Dry and Wet Ingredients
Gradually add the dry ingredients to the wet mixture, mixing until just combined. Be careful not to overmix; you want to keep that lovely, soft texture. If you see a few flour streaks, that’s perfectly fine! It’s better to under-mix than over-mix at this stage.
Step 6: Chill the Dough
Now, it’s time to chill the dough. Cover the bowl with plastic wrap and pop it in the refrigerator for about 30 minutes. Chilling the dough helps the cookies maintain their shape while baking, preventing them from spreading too much. Plus, it enhances the flavors, making each bite even more delicious!
Step 7: Shape and Coat the Cookies
Once the dough is chilled, it’s time to roll it into balls. Use a tablespoon or cookie scoop to portion out the dough, then roll each piece into a ball. After that, coat each ball generously in powdered sugar. This not only adds sweetness but also creates that beautiful crinkle effect when baked!
Step 8: Bake the Cookies
Place the coated cookie balls on a baking sheet lined with parchment paper, leaving some space between them. Bake in your preheated oven for 10-12 minutes. Keep an eye on them; the edges should be set while the centers remain soft. They’ll continue to firm up as they cool!
Step 9: Cool and Serve
After baking, let the cookies cool on the baking sheet for a few minutes before transferring them to a wire rack. This cooling time allows them to firm up a bit. Once they’re completely cool, you can store them in an airtight container for up to a week. But let’s be honest, they probably won’t last that long!
Tips for Success
- Make sure your butter is softened, not melted, for the best texture.
- Don’t skip the chilling step; it’s key for perfect cookies!
- Use a cookie scoop for uniform sizes, ensuring even baking.
- Experiment with the amount of food coloring for a vibrant look.
- Store cookies in an airtight container to keep them fresh longer.
Equipment Needed
- Mixing bowls: A set of various sizes is handy; you can use any large bowl if needed.
- Electric mixer: A hand mixer works great, but a whisk can do the job too.
- Baking sheet: Use any flat baking tray; just line it with parchment paper.
- Cookie scoop: A tablespoon works well if you don’t have one.
- Wire rack: A cooling rack is ideal, but a plate can work in a pinch.
Variations
- Chocolate Chip Red Velvet Crinkle Cookies: Add a cup of semi-sweet chocolate chips to the dough for a delightful twist.
- Nutty Delight: Incorporate chopped walnuts or pecans for a crunchy texture that complements the soft cookie.
- Gluten-Free Option: Substitute all-purpose flour with a gluten-free blend to make these cookies suitable for gluten-sensitive friends.
- Dairy-Free Version: Use coconut oil or a dairy-free butter substitute to create a delicious dairy-free treat.
- Red Velvet Crinkle Brownies: Transform the cookie dough into brownie batter by adding an extra egg and baking in a square pan for a fudgy dessert.
Serving Suggestions
- Pair these Red Velvet Crinkle Cookies with a glass of cold milk for a classic treat.
- Serve them alongside a warm cup of coffee or tea for a cozy afternoon snack.
- For a festive touch, arrange cookies on a decorative platter with fresh berries.
- Drizzle with white chocolate for an elegant presentation.
FAQs about Red Velvet Crinkle Cookie
Can I use a different type of food coloring?
Absolutely! While red food coloring gives these cookies their signature look, you can experiment with other colors. Just keep in mind that the flavor might change slightly if you use natural alternatives like beet juice.
How do I store leftover cookies?
To keep your Red Velvet Crinkle Cookies fresh, store them in an airtight container at room temperature. They’ll stay delicious for up to a week. If you want to keep them longer, you can freeze them for up to three months!
Can I make the dough ahead of time?
Yes! You can prepare the dough in advance and chill it in the refrigerator. Just make sure to wrap it tightly in plastic wrap. When you’re ready to bake, simply roll and coat the cookies in powdered sugar before baking.
What can I serve with these cookies?
These cookies pair wonderfully with a glass of milk or a warm cup of coffee. For a festive touch, serve them on a platter with fresh berries or drizzle with white chocolate for an elegant presentation.
Why are my cookies not crinkling?
If your Red Velvet Crinkle Cookies aren’t crinkling, it could be due to overmixing the dough or not chilling it long enough. Make sure to follow the steps carefully for that perfect crinkle effect!
Final Thoughts
Making Red Velvet Crinkle Cookies is more than just baking; it’s about creating sweet memories in the kitchen. The joy of watching those vibrant cookies puff up and crackle is a delight that never gets old. Each bite is a soft, chewy reminder of love and warmth, perfect for sharing with family or enjoying solo with a cup of coffee. Whether it’s a special occasion or just a Tuesday, these cookies bring a festive spirit to any day. So roll up your sleeves, embrace the mess, and let the magic of baking fill your home with happiness!
Print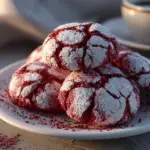
Red Velvet Crinkle Cookie: Discover the Secret Recipe!
- Prep Time: 15 minutes
- Cook Time: 12 minutes
- Total Time: 45 minutes
- Yield: 24 cookies 1x
- Category: Dessert
- Method: Baking
- Cuisine: American
- Diet: Vegetarian
Description
Deliciously soft and chewy red velvet crinkle cookies, dusted with powdered sugar for a festive touch.
Ingredients
- 2 cups all-purpose flour
- 1 tablespoon cocoa powder
- 1 teaspoon baking powder
- 1/2 teaspoon salt
- 1/2 cup unsalted butter, softened
- 1 cup granulated sugar
- 1 large egg
- 1 tablespoon red food coloring
- 1 teaspoon vanilla extract
- 1/2 cup powdered sugar for dusting
Instructions
- Preheat the oven to 350°F (175°C).
- In a bowl, whisk together flour, cocoa powder, baking powder, and salt.
- In another bowl, cream the butter and sugar until light and fluffy.
- Add the egg, food coloring, and vanilla extract to the butter mixture and mix well.
- Gradually add the dry ingredients to the wet ingredients and mix until combined.
- Chill the dough in the refrigerator for 30 minutes.
- Roll the dough into balls and coat them in powdered sugar.
- Place the cookies on a baking sheet lined with parchment paper.
- Bake for 10-12 minutes or until the edges are set.
- Let cool on the baking sheet for a few minutes before transferring to a wire rack.
Notes
- For a more intense red color, add more food coloring.
- Store cookies in an airtight container for up to a week.
- These cookies can be frozen for up to 3 months.
Nutrition
- Serving Size: 1 cookie
- Calories: 150
- Sugar: 10g
- Sodium: 50mg
- Fat: 7g
- Saturated Fat: 4g
- Unsaturated Fat: 2g
- Trans Fat: 0g
- Carbohydrates: 20g
- Fiber: 1g
- Protein: 2g
- Cholesterol: 20mg


